
Logo Creation
The “Logo” or “Brand” is the symbol or mark you use to represent yourself, your business and your products. It’s a pretty important part of your overall brand and it is worth taking some time to consider what you want before you begin working with a Graphic Designer. I strive to come up with practical logo designs that not only reflect our Clients but also are easy to use in a variety of applications.
Here is an example of the process we took to get from no logo to a beautiful, creative logo for The Tasty Oven.
Case Study: The Client originally came to us in need of a unique business card however after asking questions about her business goals, we suggested starting with a logo. The Tasty Oven is a new home-based business in Brantford Ontario who are looking to expand to sell their goods at local Farmer’s Markets. They make preserves, cakes, cookies, pies and more.
Stage 1: Ask Questions, Listen to the Answers, Rough Pencil Mock-ups... leads to 3 Different Concepts (with variations) being Presented to the Client in PDF format
If you are just starting your business, I'm sure that you have done some research into how to BRAND yourself. If you haven't, I'd suggest reading some articles to get yourself acquainted with the concept of branding. You don't have to follow all the advice you read but if something stands out to you and really makes sense, I'd consider adopting that as one of your priorities and share this with your graphic designer. Your Designer is likely going to ask you some questions about what you'd like. Questions like: 1) what is your WHY behind what you DO (Maybe this is one word or a few... Maybe it's "To Create Smiles", "To Encourage", "Independence", "Provide Help to Small Businesses". Mine is "To Create Beauty" or "Beautify the World Around Me"... the answer to the WHY question will likely answer the common "What Problem Do You Solve" question; 2) what FEELING do you want to convey to your potential clients with your logo? Ultimately, your Designer needs to understand the feeling the logo needs to give off. So while it’s okay to make suggestions of certain graphics and colours, also make sure to describe the feeling you're going for.
Often I will start sketching by hand to see what ideas come to mind, then move to computer. Once you’ve had a few ideas on paper, you try to make something similar in Adobe Illustrator. It’s almost always different from your hand drawn ideas but it gives you a great place to start. The computer really gives you speed and a finished quality that you’d never have doing it by hand. Ironically, a popular style now is hand-rendered fonts. Isn’t that always the way?
If you are considering creating your own logo or hiring someone, make sure that they can provide you with a vector file (ai or eps) which is created using Adobe Illustrator or Corel Draw. The reason this is important is that a vector is based on a scaleable math equation making the logo scaleable. Vectors are also great for screen printing or embroidering on clothing. It is an expected file format that professional printers, sign makers and designers use. Also avoid ever using a photo within your logo. It is not scaleable and will make for a very large file.
Rough Sketches (the Client Never Sees, this is just for the Designer)


There are some concepts that we just don't show as it makes it harder for the Client to choose when there are too many options. We make every effort to show the very best options.
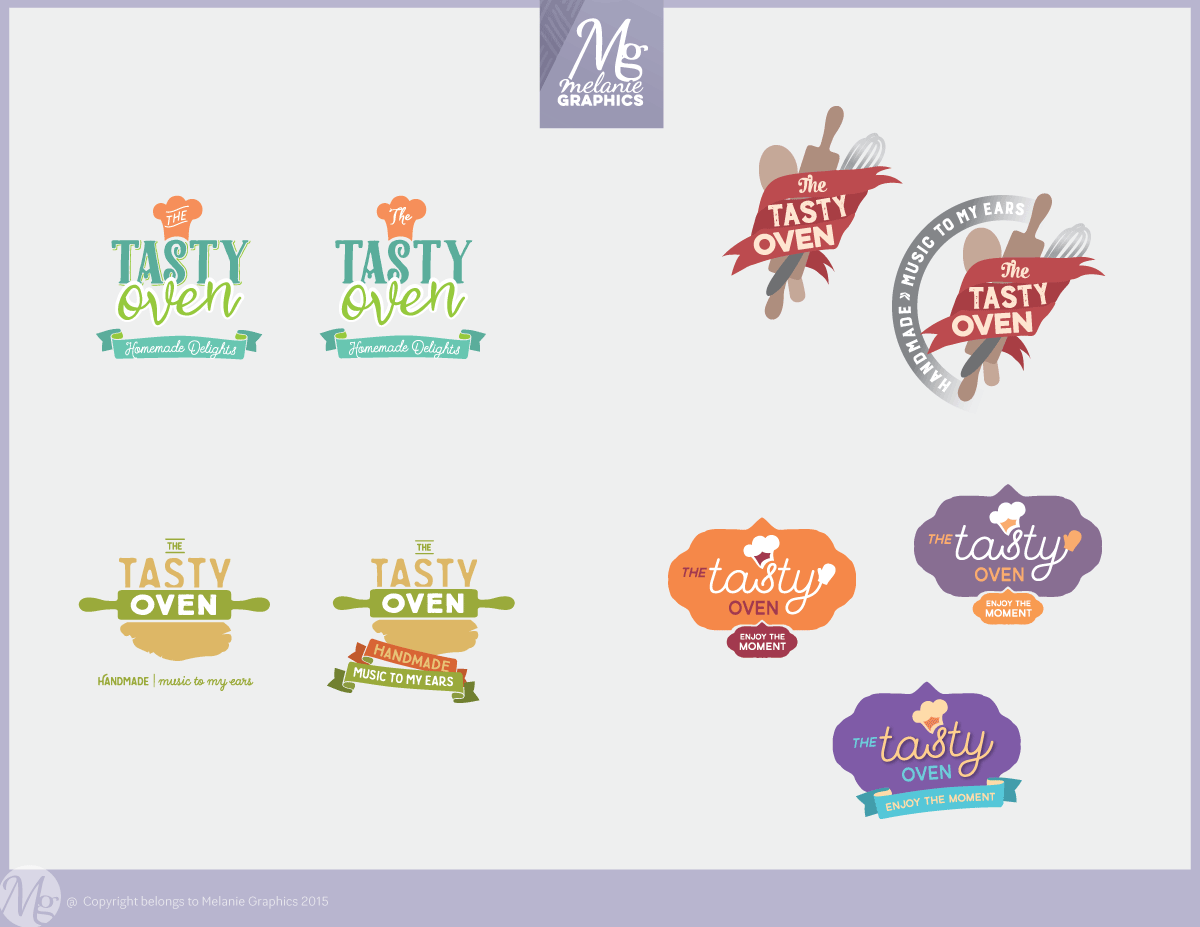
The Computer Drawn Logos Presented to the Client


Stage 2: Choosing and Finalizing the Chosen Concept
The Client chooses the logo concept that does the best job of representing the brand and it’s time for tweaks. Sometimes, as was in this case below, the Client wants changes to more than one logo to help them decide (there is typically an extra fee for this but we’re happy to oblige). After all, your logo will be the face of your business for years to come.
Once the client has chosen 1 favourite concept, we make tweaks to the colours, shapes or fonts and get it just right. In this stage, we will likely choose Pantone colours (if the client desires to have consistent colour when printing business cards, letterhead and more) Read more on this in our FAQs Printing section. Since full-colour printing is more affordable now, many companies no longer bother with Pantone colours.

By now, we have a chosen and finalized logo concept in the colours the Client prefers.
Stage 3: Finalize Logo Files and Save in Various Formats for Client’s Use
Since logos can be used on many different surfaces, I usually send multiple formats of a logo. In some cases, there may be more than one version of the logo for use vertically and horizontally, one for using black and white or just a white logo to be used on dark t-shirts. I organize the files by professional print-ready and web use and label every file so the client knows which file to choose when sending something to print.
Project Complete... stay tuned, we'll be showing the business card designs next!
“I went to Melanie not knowing what I wanted. She delivered a lot of choice with her design expertise and insight to what may look better. Ultimately you want someone who collaborates with you to get what you want in your design. I appreciate her patience and I highly recommend Melanie—she can truly do anything. Fantastic!”
— Met Bizjak from The Tasty Oven (Brantford ON)